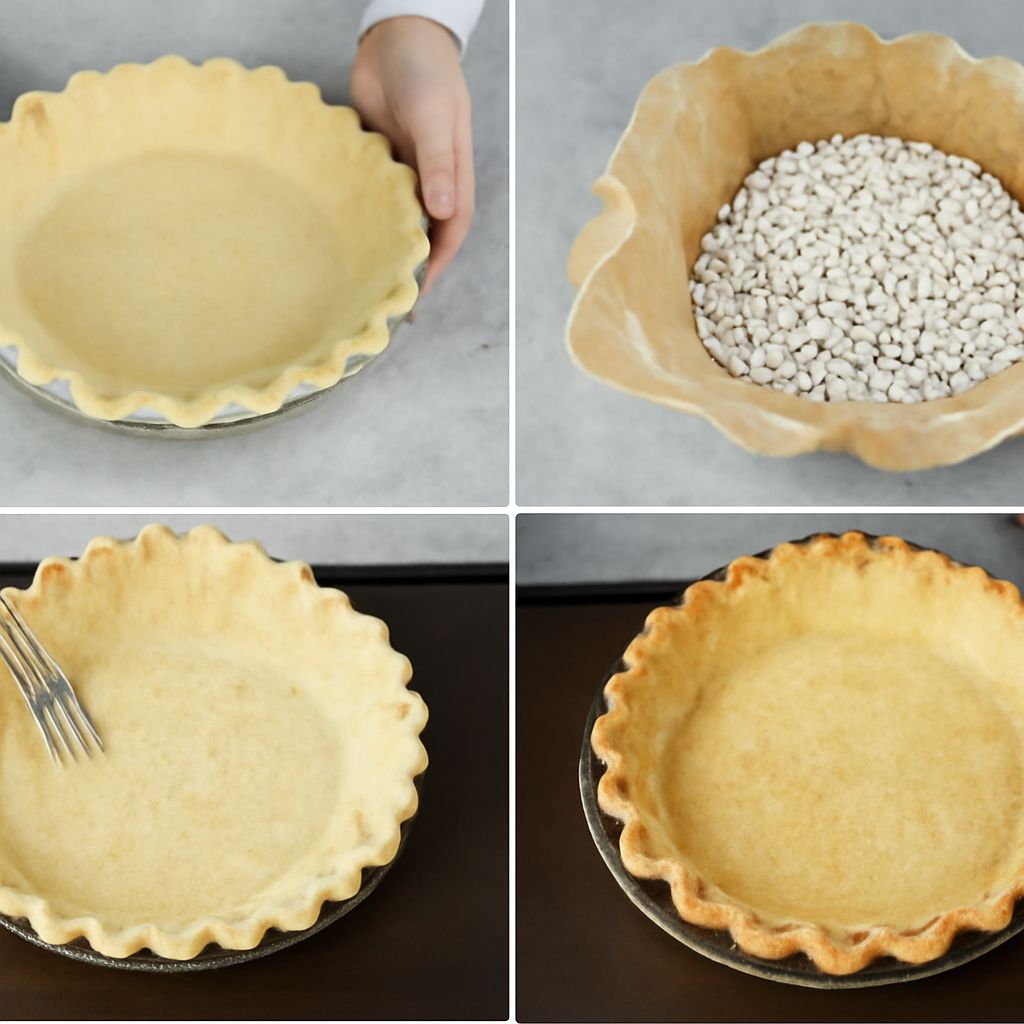
To blind bake pie crust, you partially or fully bake the empty crust before adding the filling. This keeps the bottom crisp for custard pies, cream pies, and any filling that would otherwise turn the crust soggy. For one standard 9-inch pie crust, expect about 15 to 20 minutes for a partial bake and 20 to 30 minutes for a fully baked shell, depending on whether you use pie weights and how dark you want the crust.
If you want the most reliable result, chill the shaped crust first, line it, fill it with weights, and bake until the edges are set and the base looks dry. The method below works whether you call it blind bake crust, par bake pie crust, or parbake pie crust.
Blind Bake Pie Crust Ingredients and Preparation
You only need a few ingredients and basic equipment to bake pie crust successfully.
- 1 unbaked 9-inch pie crust, homemade or store-bought
- Parchement paper or heavy-duty foil
- 2 to 3 cups pie weights, dry beans, rice, or sugar
- 1 egg beaten with 1 teaspoon water, optional for sealing the crust
Before you start, roll the dough into the pie plate, trim and crimp the edge, then chill it for at least 30 minutes. A cold crust holds its shape better and shrinks less. If your filling is especially wet, you can brush the inside with beaten egg after the first bake to help seal the surface.
If you are making a shell for a custard or cream filling, plan on a fully blind baked crust. If you are baking it again with a filling, a par bake pie crust is usually enough.
How to Blind Bake Pie Crust
- Heat the oven to 375°F. Position a rack in the lower-middle area so the bottom crust bakes well.
- Chill the shaped crust. If the dough softens while you work, refrigerate it again for 15 minutes before baking.
- Line the crust. Press parchment or foil into the shell, making sure it reaches all the way into the corners and up the sides.
- Add weights. Fill the lined crust with pie weights to the top edge. The weights keep the sides from sliding and the bottom from puffing.
- Bake for 15 minutes. The edges should look set and the crust should no longer look raw.
- Remove the weights and liner. Lift them out carefully. If the bottom looks wet or pale, return the crust to the oven.
- For a partial bake, continue 5 to 7 minutes. Bake until the base looks dry and just lightly colored. This is the version to use when the crust will bake again with filling.
- For a fully blind baked shell, continue 10 to 15 minutes more. Bake until the crust is evenly golden and crisp, especially on the bottom. If the edges darken too fast, shield them loosely with foil.
If the crust puffs after you remove the weights, press the bubbles down gently with the back of a spoon while it is still warm. A small amount of puffing is normal; large bubbles usually mean the liner did not press into the corners or the crust was not weighted enough.
For blind baking a pie crust with especially flaky dough, you can dock the bottom lightly with a fork before lining it. Docking helps release steam, but do not rely on it alone for a single-crust pie. Weights still do the main job.
How to Tell the Crust Is Done
The right level of doneness depends on how you will use the shell. Use these cues instead of the clock alone.
- For par bake pie crust: The edges are set, the center looks dry, and the color is pale blond with just a hint of gold.
- For a fully baked crust: The whole shell is light golden brown, feels firm, and sounds crisp when tapped gently.
- For underbaked crust: The bottom still looks shiny, feels soft, or looks gray and doughy in the center.
- For overbaked crust: The edges are deep brown or the whole shell tastes bitter and looks dry and fragile.
If you are using the shell for a no-bake filling, let it cool completely before adding the filling. A warm crust can melt cream-based fillings and soften the bottom.
If the recipe calls for an extra moisture barrier, brush the hot crust with egg white and bake it for 1 to 2 minutes more. That gives you a thin seal that helps protect the crust from custards and fruit fillings with a lot of liquid.
Serve, Store, or Vary the Crust
Once the crust is baked, cool it on a rack in the pie plate. If you need a neat edge for serving, trim any rough spots with a small knife while it is still slightly warm.
Use the crust right away for lemon cream pie, banana cream pie, chocolate pudding pie, or quiche. A bake pie crust method like this also works for savory fillings; just skip the optional egg wash if you prefer a plain shell.
To store a baked shell, let it cool completely, then cover it loosely with foil or plastic wrap and keep it at room temperature for up to 1 day. For longer storage, wrap it well and freeze it for up to 1 month. If the shell softens in storage, refresh it in a 350°F oven for 5 minutes before filling.
You can also vary the method based on the filling:
- Custard or cream pie: Fully blind bake the shell so it stays crisp after filling.
- Single-bake fruit pie: Par-bake only if the filling is very juicy or the recipe directs you to.
- Mini tart shells: Reduce the bake time by 5 to 10 minutes and watch closely for color.
If your goal is a crisp, sturdy base, the key is simple: keep the dough cold, use weights, and bake until the crust looks dry before you trust it with filling.